
Uncategorized
How to Hold a Guitar: Your Guide to Proper Guitar Posture
Greetings, aspiring guitarists and music enthusiasts! Are you ready to embark on a journey of proper guitar posture and discover the essential techniques for holding your guitar with comfort and ease? In this guide, we will explore the fundamental principles of how to hold a guitar, ensuring that you set the foundation for a lifetime of enjoyable playing. Whether you’re a beginner taking your first steps in the world of music or someone seeking to refine your technique, this article is your roadmap to mastering the art of holding a guitar. So, grab your instrument, find a comfortable spot, and let’s dive into the harmonious realm of proper guitar posture!
Why Proper Guitar Posture Matters
Before we delve into the specifics of how to hold a guitar, let’s understand why proper posture is crucial. Maintaining the correct posture not only enhances your playing technique but also prevents discomfort, strain, and potential injuries. Whether you’re strumming chords or shredding solos, adopting the right posture ensures optimal control over the instrument and facilitates fluid movement along the fretboard.
Sitting Position: The Foundation of Proper Posture
When sitting down to play the guitar, follow these steps for optimal posture:
1. Find a Comfortable Chair: Choose a chair with a straight back and no armrests. Ensure that your feet are flat on the ground, creating a stable base.
2. Place the Guitar: Sit on the edge of the chair, allowing the guitar body to rest on your right thigh (if you’re right-handed) or left thigh (if you’re left-handed).
3. Angle the Neck: Tilt the neck of the guitar slightly upward, maintaining a natural angle between your wrist and the neck.
4. Curved Back and Shoulders: Keep your back comfortably straight, avoiding slouching. Relax your shoulders and let your arms hang naturally.
5. Elbow Placement: Position your right forearm (or left forearm) on the upper bout of the guitar, ensuring your forearm and elbow are not raised too high.
Standing Position: Rocking the Guitar Onstage
If you prefer to stand while playing, follow these guidelines:
1. Adjust the Strap: Use a guitar strap to adjust the guitar’s height. The guitar should rest at a comfortable level on your body.
2. Balanced Weight: Distribute the weight of the guitar evenly across your body by adjusting the strap length.
3. Natural Arm Position: Keep your picking hand relaxed, with your forearm parallel to the floor. Maintain a slight bend in your elbow for ease of movement.
4. Stance and Mobility: Stand with your feet shoulder-width apart to maintain stability. Bend your knees slightly for flexibility and better control.
Guitar Position: Fretting Hand Technique
The position of your fretting hand greatly influences your playing technique:
1. Thumb Placement: Place your thumb behind the guitar neck, supporting it without gripping too tightly. This allows your fingers to press down on the strings more effectively.
2. Finger Arch: Maintain a curved finger arch when pressing down on the strings. Avoid letting your fingers collapse, as this can lead to muted or buzzed notes.
3. Finger Placement: Position your fingers perpendicular to the frets, ensuring that you press down on the fingertips and not the pads.
Strumming and Picking Hand Technique
Your strumming or picking hand technique complements your fretting hand posture:
1. Picking Hand Position: Hold the pick between your thumb and index finger. Keep your wrist relaxed and allow your hand to move freely across the strings.
2. Strumming Arm Movement: For strumming, use a fluid motion from your elbow, creating a pendulum-like movement. Experiment with various strumming patterns.
3. Palm Muting: When palm muting, lightly rest the side of your picking hand near the bridge to achieve a muffled sound.
Additional Tips for Proper Guitar Posture
Here are some extra tips to ensure you’re holding the guitar correctly:
1. Practice Patience: It may take time for your body to adjust to the proper posture. Be patient and allow yourself to build muscle memory gradually.
2. Regular Breaks: Take breaks during practice sessions to stretch and relax your muscles. This helps prevent strain and fatigue.
3. Mirror Check: Practice in front of a mirror to visually assess your posture and technique. Adjust as needed for improved alignment.
Conclusion: Mastering the Art of Proper Guitar Posture
Congratulations, you’ve now embarked on a journey toward mastering the art of holding a guitar with proper posture! By following these guidelines and incorporating them into your practice routine, you’re setting the stage for a fulfilling and enjoyable musical journey. Remember, the foundation of proper posture is built upon comfort, relaxation, and balance. So, whether you’re strumming gentle chords or shredding fiery solos, your guitar-playing experience will be enhanced by the harmonious relationship you’ve cultivated between yourself and your instrument. So, pick up your guitar, assume the correct posture, and let the melodies flow with grace and precision, creating music that resonates with joy and creativity, one beautifully held note at a time!
Have you ever wondered how the size of an acoustic guitar affects its sound? From the intimate, focused tones of a parlor guitar to the deep, resonant sound of a jumbo, the size and shape of an acoustic guitar can have a profound impact on its sonic characteristics.”
In this article, we’ll explore acoustic guitar sizes, their variations, and how to choose the perfect size that suits your needs.
 Understanding Acoustic Guitar Sizes: A Musical Puzzle
Acoustic guitar sizes refer to the dimensions and proportions of the guitar body, which significantly influence the instrument’s tonal characteristics, projection, and playability.
Just like pieces of a musical puzzle, different sizes create distinct voices that cater to various playing styles and preferences.
The Spectrum of Acoustic Guitar Sizes
Acoustic guitars come in several sizes, each with its unique qualities and attributes. Let’s explore some common acoustic guitar sizes and their defining features:
-
-
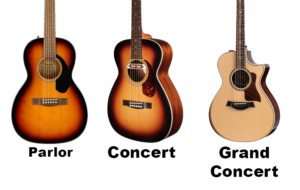
Parlor Guitar: The parlor guitar is petite and charming, making it an ideal companion for intimate settings.
The name comes from the rooms in which the guitar was typically played in the late 19th century.
Some famous musicians who have been known to use the parlor guitar are, Eric Clapton, Mark Orton, Ed Sheehan, and John Mayer
Its smaller size results in a focused and balanced sound, perfect for fingerpicking and folk music.
-
Concert Guitar: Slightly larger than the parlor guitar, the concert guitar offers enhanced projection and volume. It strikes a balance between portability and sound, making it versatile for various genres.
It is often used in classical music and flamenco music with its full sound.
-
Grand Concert Guitar: With a larger body than the concert guitar, the grand concert guitar boasts a fuller sound and improved tonal complexity.
A popular choice for those who have a smaller stature and require an instrument that’s built to a shorter scale. Great choice for traveling musicians who often play live performances.
It’s suitable for fingerstyle playing and intricate arrangements.
-
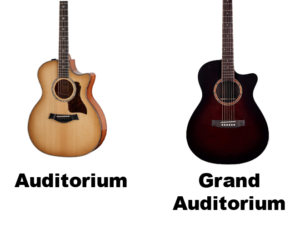
Auditorium Guitar: The auditorium guitar, also known as the orchestra model (OM), features a well-rounded sound with a pronounced midrange.
More shallower than the dreadnought and narrower in width than a concert guitar. An Auditorium guitar brings the body closer to the player, making it feel more intimate and comfortable for stage use.
Some famous musicians who play it include Ed Sheeran, John Mayer, and Eric Clapton.
-
Grand Auditorium Guitar: Expanding on the auditorium guitar’s design, the grand auditorium guitar offers a versatile sound profile with enhanced bass response and overall volume.
It is a versatile mid-sized guitar that is a good choice for those who want a single guitar to travel with. The tone is great for strumming and picking. It performs well on stage and in the studio.
It suits a wide range of musical genres.
-
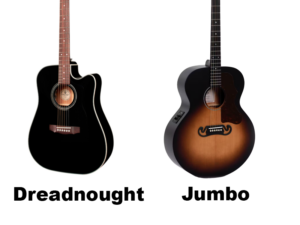 Dreadnought Guitar: The Dreadnought is a true icon, known for its bold and powerful sound. Its large body produces a strong bass response, making it ideal for strumming and vocal accompaniment.
This guitar is known for its powerful voice and lower-mid-rich tones that make it a favored choice for country artists. Although it is a popular choice for musicians of all genres.
Some famous musicians who play the dreadnought guitar include Hank Williams Jr, Elvis Presley, Keith Richards, Thom Yorke, and Kurt Cobain.
The original dreadnought guitars were made for the Oliver Ditson Company and featured mahogany backs and sides and spruce tops.
-
Jumbo Guitar: The jumbo guitar lives up to its name with a massive body that delivers robust volume and a deep bass presence.
This is the largest of the guitar family with a deeper body than the popular dreadnought. The body is wider and deeper than traditional acoustic guitars, which gives them a unique appearance.
Jumbo’s are well suited to rhythm guitarists in country and folk rock, and produce a deep rich sound favored by heavy strummers. Some famous musicians who play this guitar are Elvis Presley, George Harrison of the Beatles, Neil Young, Sheryl Crow, and Pete Townshend of The Who.
Choosing the Right Acoustic Guitar Size for You
Selecting the right acoustic guitar size involves considering factors such as playing style, comfort, and tonal preferences. Here are some steps to guide you on your quest:
-
Identify Your Playing Style: Determine whether you lean towards fingerpicking, strumming, or a mix of both. Different sizes excel in different playing styles, so choose one that complements your technique.
-
Consider Body Comfort: Hold and play guitars of various sizes to assess comfort. A guitar that fits well against your body ensures a pleasant playing experience, especially during extended sessions.
-
Evaluate Sound Preferences: Listen to the sound produced by different acoustic guitar sizes. Pay attention to tonal qualities, such as warmth, brightness, and projection, to find the one that resonates with your musical taste.
The Influence of Acoustic Guitar Sizes on Music
 Acoustic guitar sizes and shapes can have a significant impact on the sound of the instrument.
The size of the guitar body type also relates to the volume of air within the instrument. Changes to the air capacity of the body will emphasize specific frequencies. A smaller body will have a more focused sound centered on higher frequencies, while a larger body will produce deeper low-end frequencies.
Body dimensions can provide some indication of the tone you might expect, but other factors exert a profound influence, too. Much depends on the tonewoods used to construct the body and the shape, size, and layout of the braces.
Finding Harmony in Acoustic Guitar Sizes
By delving into the nuances of size, sound, and playability, you’ve gained insights that will guide you toward the perfect fit for your musical aspirations.
As you continue your exploration, remember that each acoustic guitar size has its own unique voice and character. Embrace the joy of trying different sizes, celebrate the nuances of their sounds, and let your heart lead you to the one that resonates with your musical soul.
-
Hello, aspiring guitarists and music enthusiasts! Are you ready to embark on a musical journey that introduces you to the enchanting world of the F# chord? Today, we’re diving into the captivating universe of the F# chord – a harmonious gem that adds depth and richness to your musical toolbox. Whether you’re a budding guitarist eager to expand your chord knowledge or a curious soul seeking to understand the intricacies of harmony, this guide will lead you through the mesmerizing realm of the “F# Chord.” So, pick up your guitar, find a cozy spot, and let’s explore the harmonious tapestry of musical expression and creativity!
Unraveling the F# Chord: A Touch of Elegance
Imagine the F# chord as a musical thread that weaves elegance and sophistication into your melodies. This chord’s unique tonal quality infuses your music with a sense of richness and depth, making it a versatile choice across various musical genres. Just like an artist selects the perfect brushstroke, the F# chord allows you to paint your sonic canvas with notes that evoke emotion and creativity.
Mastering the F# Chord: Crafting Harmonic Brilliance
Let’s delve into the mechanics of forming the F# chord on your guitar. Follow these steps:
1. Finger Placement: Begin by placing your index finger on the 1st fret of the low E string (the thickest string), marking the root note (F#).
2. Middle Finger: Position your middle finger on the 2nd fret of the G string (the third thinnest string), forming the major third (A# or Bb).
3. Ring Finger: Place your ring finger on the 3rd fret of the D string (the fourth thickest string), creating the perfect fifth (C#).
4. Strumming: Focus on strumming from the A string (the fifth thickest string) down to the high E string (the thinnest string), omitting the low E string (the thickest string) for a cleaner sound.
5. Sound Check: Strum the strings individually to ensure each note rings out clearly. Adjust finger placement if needed for a resonant sound.
Exploring F# Chord Variations: Adding Flair
While the F# chord is inherently elegant, you can add variations to elevate its sonic possibilities. Here are a couple of ways to experiment:
1. Add Arpeggios: Instead of strumming all the strings at once, try playing the notes of the F# chord individually in a sequence to create arpeggios that cascade like a gentle stream.
2. Chord Progressions: Incorporate the F# chord into various chord progressions to create unique musical landscapes that showcase its richness.
The F# Chord in Action: Musical Styles
The F# chord’s distinct and rich quality makes it a favorite choice for songs that demand depth and resonance. Here are a few popular songs that feature the F# chord:
1. “Wonderwall” by Oasis: The F# chord contributes to the iconic strumming pattern that defines this beloved acoustic anthem.
2. “Hotel California” by Eagles: The F# chord adds a layer of sophistication to the intricate guitar harmonies of this classic rock masterpiece.
Tips for Mastering the F# Chord
As you embark on your journey to master the F# chord, consider these tips to enhance your playing:
1. Practice Regularly: Dedicate focused practice time to build muscle memory and finger strength for the F# chord.
2. Smooth Chord Transitions: Work on transitioning smoothly between the F# chord and other chords to improve your overall playing fluency.
3. Experiment with Dynamics: Explore playing the F# chord softly and gradually increasing the volume to add dynamics to your playing.
Conclusion: Embrace the Elegance of the F# Chord
Congratulations, you’ve embarked on a harmonious journey through the captivating universe of the F# chord. As you strum, experiment with variations, and play songs, you’ll discover the power of this chord to infuse your music with richness, depth, and resonance. Keep practicing, keep exploring, and keep embracing the enchanting allure of the F# chord. It’s your key to a world of musical expression, where each note resonates with elegance and sophistication. So, pick up your guitar, let your fingers dance across the strings, and let the captivating world of the F# chord lead you toward a realm of melodies that captivate the heart and elevate the soul, one harmonious note at a time!
In the world of music, precision is paramount. Just as a symphony’s harmony hinges on the accurate tuning of each instrument, the melodic magic of an electric guitar springs forth from its perfectly tuned strings. Whether you’re an aspiring rock star or a seasoned guitarist, the process of tuning your electric guitar is an essential skill that can elevate your playing to new heights. This article is your comprehensive guide to achieving pitch-perfect tuning, ensuring that every strum, chord, and riff resonates with clarity and brilliance.
The Basics of Guitar Tuning
Tuning a guitar involves adjusting the tension of its strings to match specific pitches. A properly tuned guitar ensures that each string produces the correct note when played open or fretted, enabling you to play in tune with other instruments or recordings.
Step-by-Step Tuning Process
1. Choose Your Reference Pitch: Start by choosing a reference pitch for your tuning. The most common reference pitch is A440, which means that the A string (the second thickest string) is tuned to vibrate at 440 Hz.
2. Tune the Low E String: Begin by tuning the low E string (thickest string) to the reference pitch. You can use an electronic tuner, a tuning app, or another tuned instrument as a reference.
3. Use the 5th Fret Method: After tuning the low E string, press down on the 5th fret of the low E string. This produces the pitch of the open A string. Adjust the tuning peg of the A string until it matches the 5th fret of the low E string.
4. Tune the Remaining Strings: Following the 5th fret method, tune the remaining strings as follows:
Press down on the 5th fret of the A string to tune the D string.
Press down on the 5th fret of the D string to tune the G string.
Press down on the 4th fret of the G string to tune the B string.
Press down on the 5th fret of the B string to tune the high E string.
5. Check and Fine-Tune: Once all strings are tuned using the 5th fret method, play open chords and individual notes across the fretboard to ensure that your guitar is in tune in various positions.
6. Double-Check Intonation: After tuning, it’s important to check your guitar’s intonation. This involves comparing the open string to the note at the 12th fret. If the 12th fret note is not in tune, you may need to adjust the saddle position on the bridge.
Alternate Tunings and Tools
While standard tuning (E A D G B E) is the most common, electric guitars can be tuned to various alternate tunings to achieve unique sounds. Some popular alternate tunings include drop D (D A D G B E) and open G (D G D G B D).
In addition to electronic tuners and tuning apps, guitarists can also use pitch pipes, tuning forks, or even their ears to achieve accurate tuning. Learning to tune by ear is a valuable skill that enhances your overall musicality.
Maintaining Tuning Stability
To maintain tuning stability, consider the following tips:
1. Quality Strings: Use high-quality guitar strings that hold their tuning well.
2. String Stretching: After restringing or changing tunings, gently stretch and retune the strings several times to minimize initial tuning instability.
3. Proper Stringing Technique: Properly wind the strings around the tuning pegs to prevent slippage.
4. Nut and Bridge Care: Ensure that the nut and bridge are properly lubricated and well-maintained to minimize friction and keep strings in tune.
Conclusion
Tuning your electric guitar is the gateway to unlocking a world of melodious possibilities. Whether you’re unleashing thunderous power chords or weaving intricate solos, the process of tuning ensures that your instrument is ready to produce the full spectrum of sounds your musical heart desires. With a keen ear, a reliable tuner, and a touch of patience, you can master the art of tuning your electric guitar and embark on a harmonious journey of musical expression that resonates with precision, clarity, and resonance.
-
advanced9 years ago
How to Play “Sleepwalk” on the 3-String Guitar! Guitar TABs Included!
-
beginner8 years ago
3-String or 4-String? How to Decide Which is Right for You!
-
beginner9 months ago
Exploring Different Guitar Types: A Beginner’s Guide
-
Blues Guitar8 years ago
Go-To Tunings for Blues Slide Guitar
-
advanced9 months ago
Fun and Effective Guitar Exercises: Elevate Your Playing with These 5 Simple Techniques
-
Blues Guitar7 years ago
Jack Daniel’s Whiskey Barrel Guitar: How It’s Made and What it Sounds Like
-
Uncategorized9 months ago
Acoustic Guitar Sizes: Finding Your Perfect Fit
-
Guitars9 months ago
Bass vs Guitar: Exploring the Musical Journey